Learn everything there is to know about air admittance valves (AAVs) and how to install one yourself to save money and time.
An Air Admittance Valve (AAV), which you may also hear referred to as a Studor Vent, Studor AAV or Mini Vent, is a one-way mechanical valve that is installed locally at the site of a plumbing fixture, allowing proper venting to occur without a connection to a larger venting system and stack vent.
All of the important details are provided in this post, so keep reading.
Table of Contents
How Does An Air Admittance Valve Work?
A clever system that is activated by negative pressure is used by an air admittance valve. When there is a decrease in pressure, the valve opens to let air into the pipe. The valve again closes after restoring the pressure balance. This permits air to be drawn in when needed but stops unwelcome odors from entering the house.
Rubber seals are frequently used on air admittance valves to help form a tight seal, enhancing the valve’s efficiency and preventing any odors from escaping through tiny gaps.
Typically, push-fit joints are used to attach air admittance valves. This makes it possible to assemble pipes and sockets without the need for tools. Push-fit joints use a rubber seal to produce a fitting that is completely water- and airtight. They can also be purchased with solvent weld joints, though. These use the chemical reaction that occurs when a solvent is applied to form a lasting, airtight and watertight bond.
Also Check:
When Do You Need An Air Admittance Valve?
When a plumbing drainage system experiences negative pressure due to the flow of water, AAVs allow air to enter the system. Gravity closes the vent terminal to stop sewer gases from leaking into a building once the system’s pressure is equalized (which shows that no water is flowing).
1. When You Can’t Connect to An Existing Venting System
AAVs are a great alternative if you are unable to connect to an existing venting system because of complicated pipe routing issues or obstructions; they are the perfect venting solution for island sinks, distant bathroom groups, home remodels, and additions that would otherwise require the use of specialized venting techniques to connect to a stack vent. In other words, AAVs give homeowners more freedom in how they arrange their plumbing fixtures.
2. To Reduce Roof Penetrations
There is no need to make a new roof penetration because AAVs operate in tandem with standard DWV system operation. For aesthetic and design reasons, many homeowners also prefer not to vent through the roof line. The risk of leaks can also be decreased over time by having fewer roof penetrations.
3. To Save Money
Due to these factors, installing an AAV is less expensive than running vent pipe in new construction applications because it requires less labor and materials.
Be sure to confirm that the installation of an AAV in your plumbing system will be permitted for your specific application by contacting your local municipality before beginning.
Key Considerations When Selection and Installing An AAV
Local Code and Manufacturer Requirements: To find out if an AAV is authorized for your specific application, be sure to check with your local municipality’s codes and manufacturer specifications before visiting your neighborhood supply store. If using an AAV is not allowed, the fixture or drainage system must be vented conventionally using the house’s existing venting system.
Sizing: Based on the Drainage Fixture Unit (DFU) load of the fixture(s), such as an island sink or bathroom group, it will vent, you can determine the size AAV you’ll need. DFUs are the unit of breath rate for an AAV. A greater amount of air can enter the Drain-Waste-Vent (DWV) system if the valve has a higher DFU rating.
DFU loads are assigned to plumbing fixtures based on the volume rate of discharge, the time between operations, and the duration of operation. The following table lists typical fixture load ratings.
Choose the appropriate AAV for the application after determining all fixtures that need to be vented and totaling the DFU load to ensure proper breathing capability. Undersizing will prevent the plumbing system from functioning properly, so proper AAV sizing is essential.
AAVs are typically available with 1 ½”, 2″, 3″ and 4″ adapter connections. The diameter of the vent pipe that the adapter is being installed on determines its size. In general, a vent’s size should be half that of the drain it is intended to serve (check local codes for exact vent size recommendations).
Pipe material: In order to make sure the AAV adapter is compatible, you should also confirm the kind of pipe material you will be using. So, AAVs with PVC adapters should only be used with PVC pipe, and AAVs with ABS adapters should only be used with ABS pipe.
AAV location: Within the maximum developed length allowed for the vent, an AAV should be situated. It must be located a minimum of 4″ above the horizontal branch drain, 6″ above any insulation material and within 15 degrees of vertical. AAVs must be installed in a location that allows air to enter the valve because they cannot be permanently covered. Should a replacement need arise in the future, they must also be reachable.
How to Install An Air Admittance Valve to Fix a Slow-Draining Sink
Find below step-by-step guidelines.
1. Understand How Air Admittance Valves Work
It’s critical to comprehend how AAVs operate before installing one. Gravity is used to open air admittance valves. A drain line experiences negative air pressure when water and waste are moving through it. As a result of the negative pressure, the sealing washer is lifted, allowing air to enter and the waste to drain freely.
The sealing washer repositions itself when the negative pressure is released. Spring-operated models of this device were previously available. These units are still available, but they are unreliable and frequently do not comply with codes.
2. Determine Placement
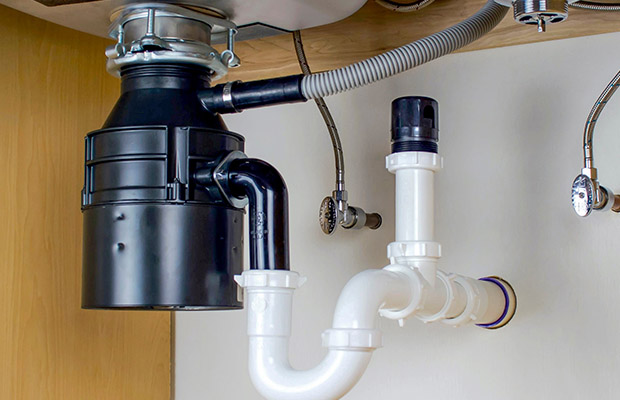
Normally, air admittance valves are positioned between a fixture’s P-trap and the drain line. They are typically mounted on one sanitary tee leg, with the other leg leading to the drain. The unit must be installed in accordance with local regulations and manufacturer guidelines.
3. Install PVC Drain Line
Install the PVC drain line, the sanitary tee, and the P-trap for the sink. The AAV’s proper coupling, either threaded or glued, is connected to the tee. The correct height for the AAV above the drain should be determined by consulting local codes and manufacturer instructions.
4. Attach Air Admittance Valve
Glue or screw the AAV into the fitting, as appropriate. If you require more guidance, consult the manufacturer’s instructions.
5. Check Work
The finished installation ought to resemble this, depending on regional regulations and the AAV model. AAVs must always be mounted vertically and must not be obstructed by objects placed beneath the sink.
Advantages of Air Admittance Valves
A plumbing system’s requirement for venting supplies can be significantly decreased by an AAV. The plumber can put that money in his pocket.
They also allow for more flexibility in plumbing fixture layout and require less frequent roof maintenance.
Maintaining the roof is simpler if there isn’t a hole in it. For more than 20 years, AAVs have been used successfully in Europe. There are a few restrictions, though.
Potential Issues With Air Admittance Valves
Unwanted odors, gargling noises, or wastewater entering the sink through the soil pipes can all happen occasionally. All of these indicate a potential problem with the air admittance valve.
The valve might occasionally become stuck. In that case, a quick spray of lubricant ought to help to loosen the valve and make sure it is once again in functional order.
The possibility of a blocked waste pipe is another explanation for these problems. This would stop gases from being forced into the sewer and stop water from draining away. Check out our guide on how to unclog a drain to find a solution.
The air admittance valve being installed at an incorrect height could be another problem. Make sure the valve is higher than any shower head, bath head, sink head, or toilet to lessen the likelihood that this problem will arise.
Read More:
FAQs
How Long Do Air Admittance Valves Last?
With a 500,000 cycle lifetime claim, Studor offers a 10-year warranty. Another concern with an air admittance valve is that it might leak if there is a sewage backup.
Where Should An Air Admittance Valve Be Installed?
The standard practice is to install air admittance valves on soil pipes at least 200mm above the highest water entry point, i.e. the highest point wastewater will reach within a soil pipe. However, they can also be installed inline by using a branch instead of the end of a soil pipe.
In order to avoid being unsightly, air admittance valves are typically installed in lofts or cabinets. They do need some ventilation, though. As a result, it’s crucial to make sure they are in an area with a flow of air. Additionally, make an effort to position the air admittance valve in an area that is easy to access in case a blockage requires access.
What is An Ideal Air Admittance Valve Installation Height?
The short answer is a minimum of 200mm above any water entry point.
Does AAV Have to Be above Drain?
After the DWV testing mandated by Section P2503, the AAVs must be installed. 5.1 or It has been carried out P2503.5.2. Individual and branch-type AAVs shall not be located not less than 4 inches (102 mm) above the horizontal branch drain or fixture drain being vented.
Do Air Admittance Valves Stink?
Odor is frequently an indicator of a faulty air admittance valve. The detectable smell will intensify as odors from your RV’s gray tank leak into the living area, frequently to an intolerable level that you can’t ignore. So, check this valve first if you smell something fishy.